It is mandatory worldwide especially in the North America and Europe continents, diesel and petrol engines need to regulate their nitrogen oxide emissions to create a less polluted atmosphere. That’s why all car manufacturers have create polution categories for motor vehicles such as EURO4 EURO5 EURO6, the higher number the less poluting car is, and the less tax is required to pay to the government. In response to comply with increasingly strict NOx emission regulations, manufacturers of most vehicles such as Audi, Volkswagen, Peugeot, Jaguar, Citoren, Mercedes and many other have been doing this with the use of SCR technology so that the diesel vehicles are regulated easily. A major supplement component of that SCR system is NOx sensors. These are state of the art high temperature sensors that monitor the level of NOx being emitted and released into the air through exhaust system.
Since, accurate NOx measurements are mandatory to pass MOT so if you are driving a diesel-powered and or petrol car, emitting Nitrogen oxide in variance to the standard levels, it turns out to be a non-compliant vehicle to the emission regulations on the road. To ensure, you are driving a law compliant vehicle, let’s first have a look on what NOx sensors really are and then we will see why they malfunction and how can we fix them.
What is NOx Sensor?

The Nox sensors used in diesel and petrol vehicles with urea-based SCR system to monitor the emission of nitrogen oxide from the vehicle and sending the information to the control unit (SCR) for adjustments in levels of urea. NOx sensors are also designed to monitor oxygen levels in the exhaust system and contribute to better fuel economy and cleaner air.
How do NOx sensors actually work?
There are 1 or 2 NOx sensors in an after treatment system, all depends on the car model manufacturer etc. and these sensors help the ECU to make real time adjustments and optimize NOx conversion performance. When the sensors detect too much NOx emission, it communicates to the SCR system which adjusts the urea levels accordingly.
Nox sensors have a dual chamber design that measures both oxygen and NOx content so when the exhaust enters the sensor, oxygen is pumped out and NOX find its way to the second chamber where the gas is exposed to the catalyst. This way this emission is calculated, and information is reported to the computer.
Why NOx sensors stop working?
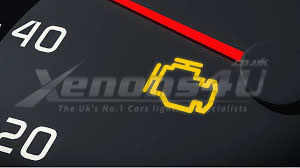
Accuracy of information sent to SCR depends on how good the sensors are working, like oxygen sensors, NOX sensors will not work unless they are at the correct temperature or moisture during a cold start could also interfere with NOX sensor operation. But most of the times, it’s the sensors probe that is used to test NOx levels; which is the real culprit. Inaccurate Nitrogen Oxide emission control unit’s readings could lead to triggering check engine light symbol on the dashboard also known in short CEL.

Like every electronic part nothing lasts forever, so that’s nothing new that part needs to be replaced, especially Nitrogen Oxide probe as it is being affected by hot caused from exhaust system and constantly getting in touch with various particulates coming out of the engine.
But there is nothing to be worried about as we’ll explain how to fix malfunctioning SCR system.
Definitions of the most common NOx diagnostic trouble codes:
- P1033 - Nitrogen Oxides Sensor Signal Too Low
- P1033-002 - Signal to low - MIL ON
- P1032 - Nitrogen Oxides Sensor Signal Too High
- 17441 - Sensor for NOx (G295)
- 17443 - Sensor for NOx (G295)
- P1034 - Nitrogen Oxides Sensor Signal Outside Tolerance
- P1035 - Nitrogen Oxides Sensor Range Performance Problem
- P1035-001 - Signal Implausible
- 17441: sensor for nox (G295) P1033-002 - signal too low - intermittent
Every different combination means different malfunction, but these are the most popular.
Nitrogen oxides NOx sensors – signals too low (Generic description of fault code P1033 17441)
If your diagnostic test results in this code then it is possible that the problem is with the upstream sensor located at the turbo side of the SCR mechanism which directly measures the engine-out NOx gas concentration, and helps determine the optimum amount of urea that must be injected to adjust the amount of nitrogen oxide released by the vehicle.
NOx sensors – range / performance problem (Generic description of fault code P1035 17443)
If diagnostic trouble code is P1035 it means that NOx sensor located at the outlet of the SCR which monitors the performance of the catalyst is faulty.
The two signals sent directly to the engine control module are then compared to determine the conversion efficiency of your system.
When car has malfunctioning NOx sensor or sensors, you will always see check engine light symbol on the dashboard.
Replacing NOx sensors with new ones could be really expensive and complicated so it’s important that you run a diagnostic check before doing any work and compare provided diagnostic trouble codes to our ones in the blog. In case problem is identified as the faulty NOx sensor and error codes are P1032 P1033 P1034 and or P1035 then fixing malfunctioning sensor can be simple and inexpensive DIY job.
If error codes say that there is no communication with sensor or sensor couldn’t be found – then you’ll need to buy whole sensor, ballast unit with integrated probe.
Bear in mind that NOx sensor probe is not universal, it is very important to get proper advises and right parts as there many different NOx sensors with 5, 6 or 8 wires.
For example, there many different VAG VW Audi siemensvdo NTK and continental part numbers.
A short list of available part numbers:
- 06F907807E 5WK96603A 06F907807F 5WK96607
- 06F907807A 5WK96603 06F907807D 5WK96603B
- 06F907807B 5WK96608
- 03C907807A NZA05-V1 SW420
- 03C907807D NZA05-V4 SW422
- 03C907807C NZA05-V3 SW420
At XENONS4U we can provide you correct parts as we have many different repair kits for all sensors.
P1033 and P1035 DTC are mostly shown on VAG group cars such as Audi A3 8P VW Golf MK5 V 1.6 1.8 FSI and Touran MPV MK1 Skoda Octavia cars.
How to fix and replace a faulty NOx sensor probe
Fixing faulty sensor’s probe on your own is a quick and easy procedure, guide and videos are available at xenons4u YouTube channel.
Before moving towards 2 steps (removal and installation) procedure of replacing NOx sensors, set these 3 common tools ready; required to fix the faulty NOx unit which includes Scissors / knife, Electrical tape and soldering iron.
Removing faulty NOx Sensors
Now, start with removing the faulty NOx sensors from the vehicle, gain an access to the protective rubber covering sensors/ cables by tightly gripping it back with an electrical tape so that it doesn’t create any disruption and you can clearly see what you are working on. Split the cables with the help of scissors and cut them all at different lengths.
Installing new NOx sensors
Connect the matching color wires of the new probe to those protruding from emission control unit. Wrap them together and solder them carefully. For an additional strength, you may also heat the soldered areas and let it rest for a few minutes to reach a normal temperature. Your sensor is fixed now!
Do not forget when cutting wires, that it is always recommend and the best to cut wires in different length, so that connections are made at different place as it is what professional electrician would do.
After that you’ve put them back into the vehicle, clear DTC with OBD-2 reader and the illuminating light must go off and your issue must be resolved but in case it doesn’t then you should contact xenons4u for their expert advice on this matter.
Sometimes error code are triggered after replacing and clearing codes, but there is nothing to be worried about, a simple second clearing of codes procedure will do a job, as car needs to update it’s computer with new readings coming out of new Nox sensor probe.
As always if you have found this blog useful, please pass it on and share via social media.