AdBlue’s SCR system is an advanced emission control technology which injects a liquid reducing agent via a special catalyst in the exhaust stream of an engine. The source of reduction is typically automotive-grade urea, which is also known as Diesel Exhaust Fluid. When this fluid is released, it creates a chemical reaction which converts nitrogen oxide into harmless nitrogen, water, and carbon dioxide, before it is expelled via the exhaust tailpipe of a vehicle.
If you drive a newer diesel vehicle, it’s likely that it comes with AdBlue technology as standard. It’s not something that many manufacturers will advertise in an obvious manner, but many of the world’s largest car manufacturers (including Audi, Volkswagen, Peugeot, Jaguar, Citroen, and Mercedes) all make use of AdBlue technology. The sensor probe on a NOx unit is universal and fits many different car models.

The importance of the SCR system
SCR technology is a cost-effective and fuel-efficient means to help reduce diesel emissions. With carbon neutrality becoming a major issue around the world, many governments insist that diesel vehicles must feature an AdBlue SCR system to be compliant with the law on emissions. If your SCR system is not working, your vehicle could fail its MOT.
What is a Nitrogen Oxide NOx sensor?
With emissions regulations for diesel vehicles becoming more stringent, SCR systems contain a NOx sensor, which monitors the amount of nitrogen oxides being released into the air by a vehicle. If too much NOx is detected, the sensor will feed this information to the SCR system, which can then adjust its output accordingly so that the vehicle continues to meet emissions regulations. If you own a diesel-powered car, the NOx sensor is critical to the SCR system to ensure your vehicle is compliant.
How does the NOx sensor work?
The NOx sensor detects nitrogen oxides via an electro-catalytic mechanism. This is done via a working electrode which features a material that reacts with NOx. A voltage is then passed through an electrolyte, and this determines how much NOx is present in the vehicle’s system. The greater the level of NOx, the stronger the voltage.
Most NOx sensors function by initially removing oxygen before breaking down the nitrogen oxides to create a reading. If the reading is too high (or is lower than usual), the SCR system will respond by releasing more (or less) urea based on the information provided by the sensor.
Why does the NOx sensor fail?
While the NOx sensor itself is a relatively complicated (and expensive to replace) unit, it’s often the case that the sensor is completely fine, but the probe used to test for NOx levels has malfunctioned. Many people are unaware that it’s possible to simply and inexpensively replace the probe with a little bit of DIY.
Fixing a faulty sensor probe: a step-by-step guide
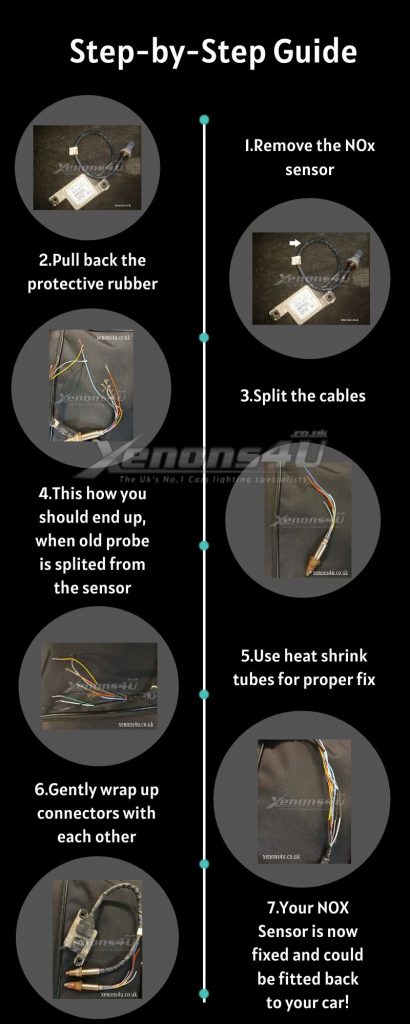

Firstly, you’ll need to run a diagnostic on your vehicle. If the codes point to the NOx sensor being at fault, you should contact Xenons4U for advice and to order any spare parts you may need to repair it. If the probe is the issue, you should then follow this step-by-step guide:
1) Remove the NOx sensor
Take the faulty NOx sensor out of your vehicle. You may need to consult your vehicle’s manual for further information on how to do this.
2) Get your tools ready
You are going to need the following to repair the NOx unit:
• Soldering iron
• Electrical tape
• Cutter/knife
• Scissors
3) Pull back the protective rubber from the unit
You will need to pull back the protective rubber which covers the sensor/cables to gain access to carry out any repair work. Make sure it is tightly gripped back with electrical tape so that you can clearly see what you are working on.
4) Split the cables
Use your knife and scissors to split the cables. It’s important to note that you should NOT cut all wires at the same location – cut them at different lengths.
5) Connect your new probe
Connect the corresponding colour-coded cables of your new probe to those protruding from your NOx emission control unit sensor. Make sure each wire is wrapped together, and then solder each wire together. You may want to use heat shrink tubes on the soldered areas to allow the cable sheathing to bind for additional strength. After you’ve soldered and applied heat to your newly repaired device, you should leave it for several minutes to reach a normal temperature.
6) Replace your NOx sensor
Now that you’ve replaced the probe on your NOx sensor, this should be the end of your diagnostic issues! Try running another diagnostic test to ensure that your device has been correctly repaired and is in full working order after you’ve placed it back into your vehicle.
If you encounter further issues with the sensor, the best practice is to contact Xenons4U for further advice – and jot down any fault codes from your diagnostic test to help the team ascertain what the problem may be.
This Nitrogen Oxide in short NOx repair guide is possible for all brands and part numbers audi vw skoda seat mercedes-benz bmw volvo daf siemensvdo continental renault opel gm vauxhall citroen peugeot and many other.
Repair kit is very popular for merecdes-benz a0009053403 5wk96681D, a0009053503 5wk96682D, a0009053603 5wk96683D, vw ag 03L907807AD 03L907807AF, 03L907807AB and many other.